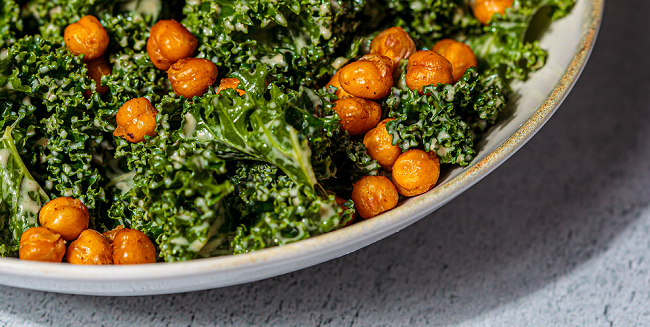
We are thrilled to introduce a collaboration with our friends at Uncomplicated Kitchen, a nonprofit organization on a mission to empower the community to cook and grow nutritious foods! I first met Jenna when she was slinging granola in Daytona. Now in Sylva, NC, she and her crew teach the community how to plan meals, shop for ingredients, and cook healthy, simple, and affordable recipes at home. As part of this exciting partnership, we're offering Front Porch Pickings members a free cooking class that you won't want to miss! And the class is perfectly timed with the first of our local kale coming in next week. Here are all the juicy details: Crispy Smoky Garbanzo Bean & Kale Salad Thursday, October 19th 5:30 - 6:30 pm EST The star of the show here is the combination of smoky, crispy garbanzo beans that are downright addictive, kale so buttery soft it's like a dream, and a dressing so good you'll want to put it on everything. This online cook-along class is all about transforming a budget-friendly dish into something that tastes like a million bucks. So, put on your favorite apron, gather your ingredients (and maybe a cocktail), and come make dinner with us! Please RSVP Directly with Uncomplicated Kitchen. While we've covered the cost of offering this class for free to our Front Porch Pickings members, you have the opportunity to make an additional donation if you choose.
Meet Jenna, Founder and Executive Director of Uncomplicated Kitchen:
0 Comments
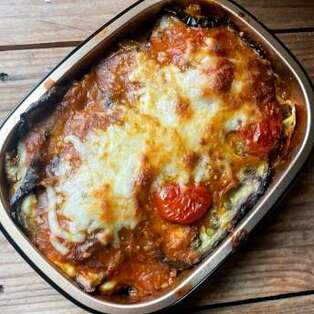
Today, I'm excited to take you on a behind-the-scenes tour of Front Porch Pickings' very own commercial kitchen. As someone deeply passionate about reducing food waste and savoring the finest flavors our community has to offer, this kitchen is truly where the magic happens. We recently added a commercial oven to our kitchen and we've been able to ramp up production! This kitchen isn't just a space for culinary creativity; it's the heart of our mission to connect you with the best of local agriculture while championing sustainability. But, one of the most incredible aspects of our kitchen is its just one more way we tackle food waste head-on. Our kitchen is a hub of culinary magic, where surplus ingredients get a second chance to shine. Imagine a surplus of perfectly ripe tomatoes from one of our local farms. Instead of letting them go to waste, we turn them into rich, flavorful tomato sauces for lasagna that graces our boxes and, ultimately, your dinner table. Those slightly bruised but still fantastic apples? They become the star of our irresistible apple pie fillings and granola.
When you savor an FPP made delectable, you're not just enjoying incredible flavors; you're also participating in a movement that values our planet's resources and supports local growers. We invite you to join us in this culinary adventure, where sustainability and taste come together in every bite.
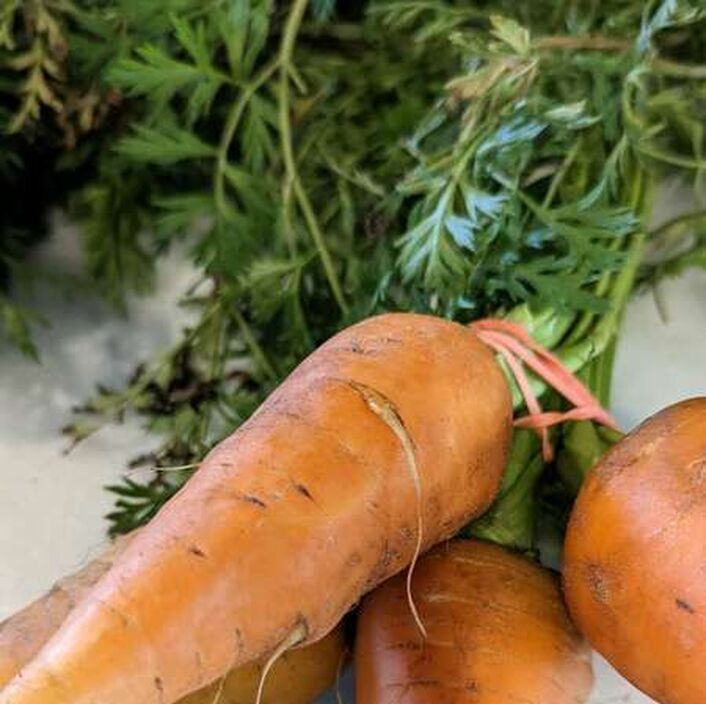 Did you know the tops of carrots are edible? I like to think of them as a 2 for 1 veggie, just like other roots! These tops are high in vitamin C, vitamin K, and potassium. They have a similar taste to parsley and can be used as a substitute. You can add to soups, salads, green smoothies or made into a delicious pesto or dip. (See Carrot Top Pesto Recipe Below) To store your veggies, tear the green leaves from the root. If the tops are not removed, they will use the water in the carrot to stay hydrated --- so do not miss this important step! Wash the tops in a salad spinner and then store in a glass or plastic container. Wash the roots, removing any dirt and store in the same or similar container. Place in refrigerator. If your carrots become limp, it does not mean that they are not fresh, but that they are dehydrated. This can happen quickly in refrigeration. Submerge them in an ice bath for an hour and they'll perk right up. 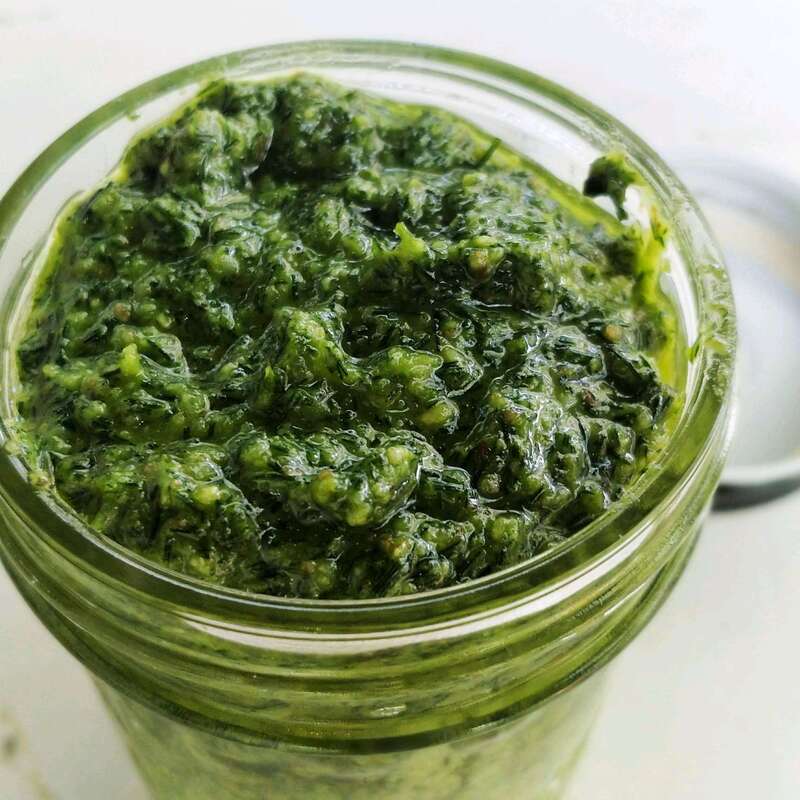 INGREDIENTS
2 cups carrot tops and stems, cleaned, dried & chopped ⅓ cup pine nuts, can substitute with walnuts or other seeds 2-3 garlic cloves ½ cup extra virgin olive oil ½ cup shredded parmesan cheese (Vegan option:nutritional yeast) ⅛ teaspoon quality sea salt ⅛ teaspoon black pepper DIRECTIONS 1 Add carrot leaves and garlic to your food processor 2 Pulse until finely chopped 4 Drizzle olive oil until the ingredients are well coated in oil but still chunky 5 Add cheese and nuts/seeds 6 Taste to see how much salt needed. May chaange based on how salty your cheese is. 7 Add Salt & Pepper to taste 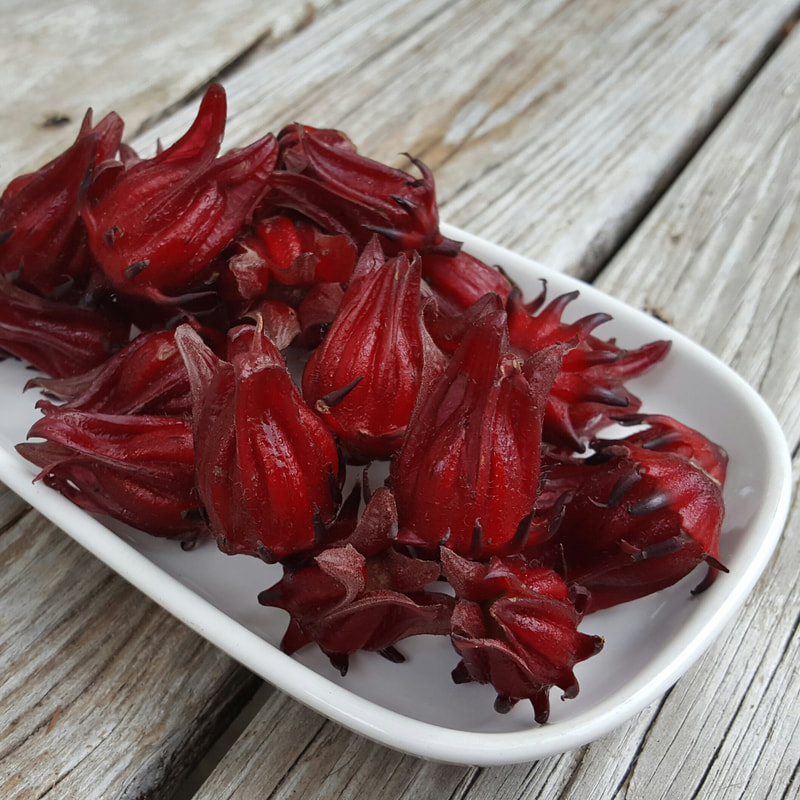 Your Roselle came from Frog Song Organics in Hawthorne, FL — less than 100 miles from most of our customers’ homes.
We were worried with all the storms that we wouldn’t be able to get this neat treat, but Frog Song was able to get us some beautiful roselle, also known as Florida cranberry, rosella, hibiscus, or sorrel. We will be receiving the red buds known as the calyces of the plant. These post-bloom pods are used in teas, jams, and other infusions like vinegars but is also used as a food coloring in the US and Europe. We encourage you to use your Roselle fresh. However, the buds can be stored in the freezer for later use. Just add the whole bud into a freezer safe container that will prevent freezer burn. When ready to use, if using for tea, you can just add to the recipe. There is no need to peel or thaw. To Brew Roselle Tea:
Breakfast, lunch, or dinner --- the deviled egg is always a favorite at Easter gatherings. Using local Clover Farm eggs and Terrapin Ridge condiments, you can make an egg everyone will remember. Happy Easter! Amie 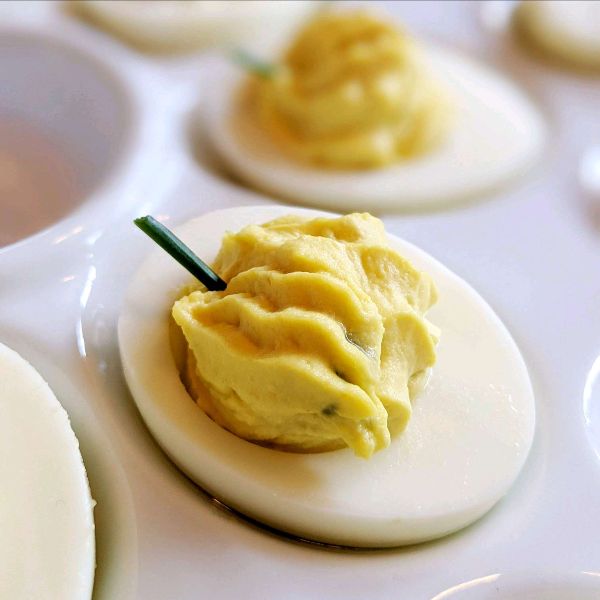 The Basic Deviled Egg
6 eggs, hard boiled, peeled, chilled and cut in half ¼ cup greek yogurt Gently remove yolks from the whites and add to a bowl. Whisk together yolks and greek yogurt. Cobb Style 2T asher blue cheese crumbled ¼ ripe avocado 2 medley tomatoes, sliced in quarters or rings 1 slice of crisp bacon Whisk blue cheese and avocado into yolk mixture, pipe into eggs and garnish with tomato slice and bacon crumble Lox Style 2 T Terrapin Ridge beet and horseradish mustard Lox salmon Thinly sliced red onion Capers Beat mustard into yolk mixture, pipe into egg halves. Garnish with salmon, onion and capers. Southern style 2 T Sweet pickle relish 1T yellow mustard Paprika Beat pickle relish and mustard into yolks, pipe into egg halves, sprinkle with paprika Show us what you’re making and tag us @fppproduce On a day that many are cooking up Corned Beef for dinner, we are breaking the tradition with Irish Cottage Pie. Cottage Pie is really the same recipe as Shepard's Pie, however, it replaces the ground beef with ground lamb (as that's what was more plentiful in Ireland). And for us Floridians, its a perfect dish right now as potatoes and corn are coming into season. 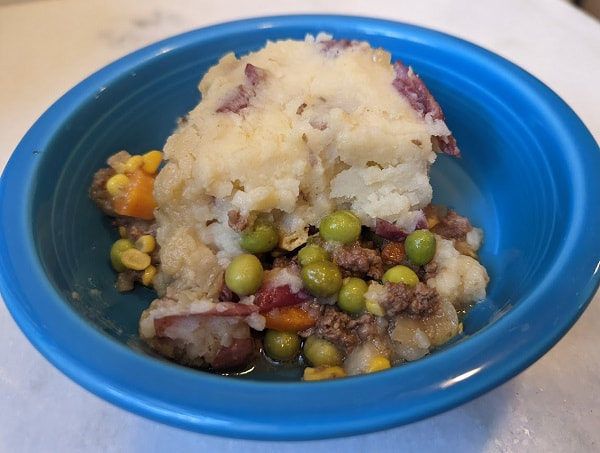 This is not your childhood cafeteria's Shepard's Pie! It's so delicious with the warm, deep flavors and soft buttery mashed potatoes. Come on, give it a try. Show us what you’re making and tag us @fppproduce!
MASHED POTATO TOPPING
FILLING INGREDIENTS
ASSEMBLING YOUR PIE
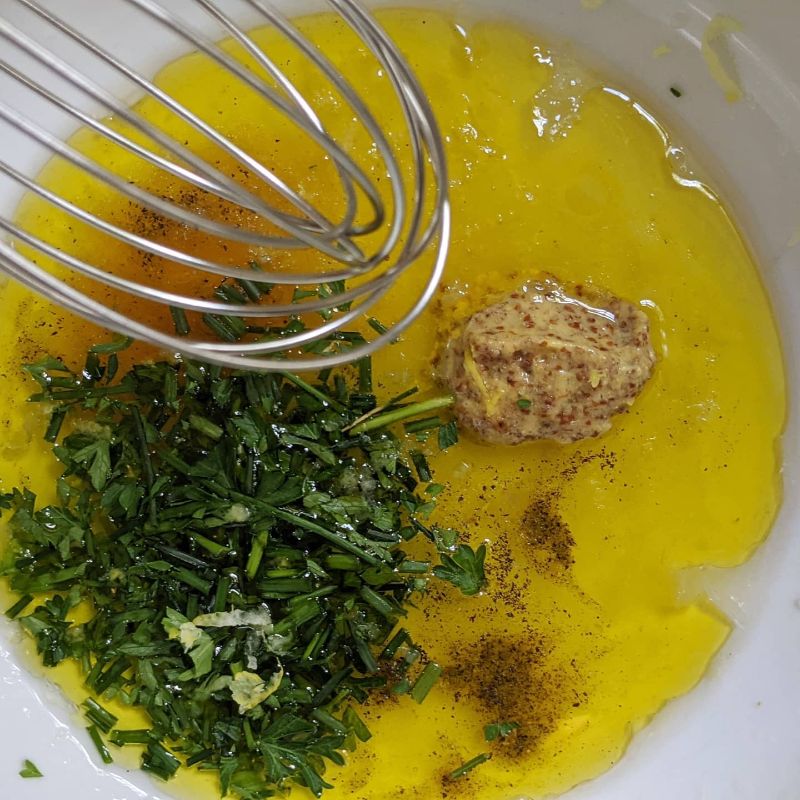 Citrus season is upon on us! So, what better way to celebrate a healthy new year than to dress your meals with a fresh homemade lemon vinaigrette. This dressing uses simple ingredients but is loaded with big, bright flavors. And so versatile, you can use to dress your salads, fish, chicken, roasted veggies, or quinoa. 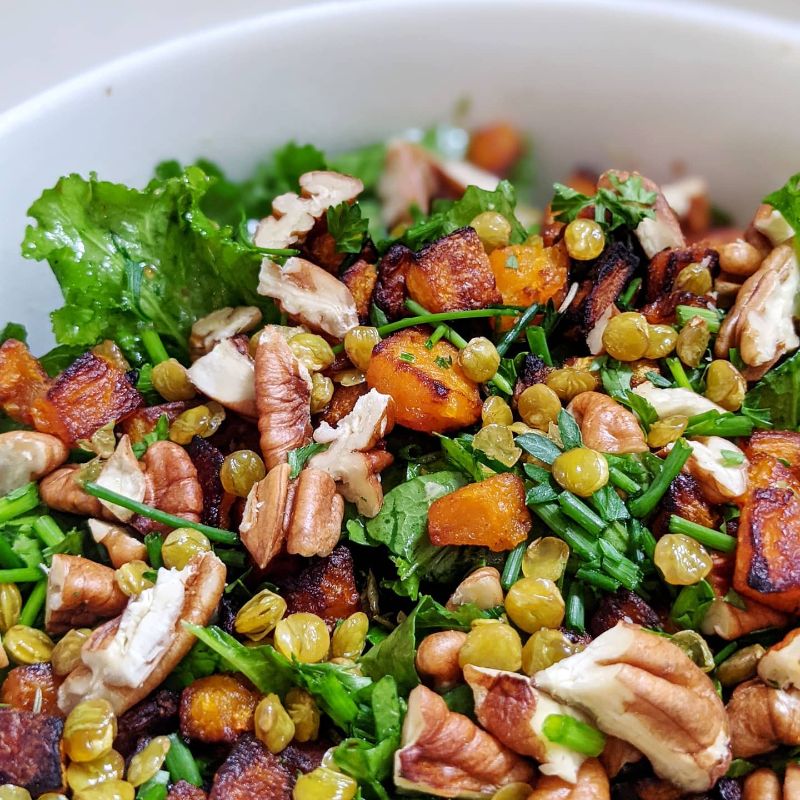 Ingredients:
1/4 cup fresh lemon juice plus the zest 1/3 cup olive oil 1 garlic clove, grated 1 teaspoon Dijon mustard 1 teaspoon honey Salt to taste (1/4 teaspoon to start) 1/8 teaspoon Black pepper 1-2 Tablespoons chopped fresh herbs! Chives, Parsley, Thyme and/or Rosemary work well. Directions: Whisk together or place in a ball jar and shake well. If using with delicate greens, dress right before serving. However, if you are using with kale, dress about 15-20 minutes before serving to tenderize the hardier greens. If you'd like to switch this recipe up and make it into a marinade or a dressing for a tabbouleh or quinoa bowls, add in more fresh herbs. 4-5 tablespoons works well to enhance the flavors. 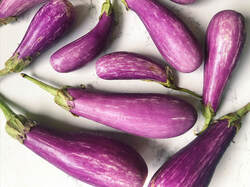 Days are getting shorter and fall is in the air! Now is a fantastic time to explore a variety of local, seasonal foods as we say goodbye to those hot, rainy summer days. Did you know that out-of-season produce is often picked early kept in cold storage for weeks or even months, losing valuable nutrients? Buying and preparing locally grown food is one of the simplest, most direct ways to positively impact your body, our community, and our land. In addition, your taste buds will benefit from all that fresh flavor! Here's a little inspiration based on items you'll find at the farmer's markets and in our boxes over the upcoming weeks - keep scrolling to check it all out!  These dainty Fairytale Eggplants from The Family Garden in Gainesville are known for their delicate skin and fresh flavor. Unlike their cousin the Globe Eggplant, this variety does not require salting before cooking to remove bitterness. Fairytale eggplant are ideal for cooking hard and fast, we recommend roasting until tender and creamy. Due to their small size, it's possible to achieve a nice char without overcooking and becoming soggy. Plus, it all comes together in just a few minutes! Halve lengthwise, score diagonally, and place cut-side down in a hot cast iron skillet to sear, then transfer to 400F oven to cook through. Or, skip the cast iron and roast on a sheet pan in the oven. Season with salt and pepper, or give your eggplant a boost by rubbing it with a spice blend before cooking.
While your eggplant is in the oven, toss together a quick cucumber and tomato salad. Swoosh hummus in a bowl, top with roasted eggplant, cucumber-tomato salad, a sprinkling of fresh herbs and call it a night. 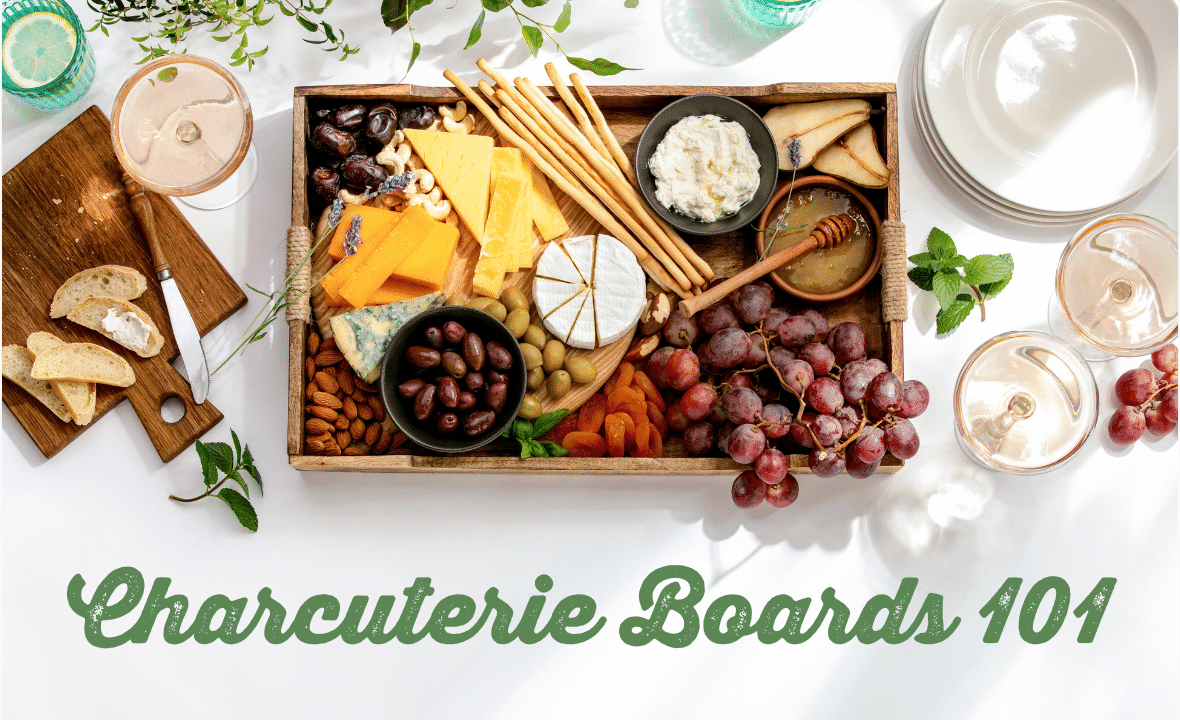 Of all the food trends, I think the charcuterie board is my favorite. It's got everything: meats, cheeses, fruits, nuts, jams, crackers, and briny bites all together on one beautifully-presented platter. And, when done well, there's salty, sweet, sour, creamy, crunchy, and all the things in between. For people who like to craft each perfect bite, the charcuterie board is the perfect epicurean experience. So what should you put on the perfect platter?
  Essentially there are no wrong answers. Arrange it beautifully and use quality ingredients starting with the largest ingredients and moving to the smallest. Make it small for an appetizer or make it huge for a meal. And, you could even go vegetarian or gluten-free if you want! Below are some helpful steps to arrange your perfect holiday platter!
Step 1: The Board Pick out your favorite cutting board or platter. I personally love a round boards, natural shaped boards, or wood trays to give a little extra dimension. Step 2: The Cheese Start by adding the cheeses as far apart as possible leaving room for the other items. Think about texture and using slices, cubes, and crumbles. When adding a triangle of cheese, be sure to leave the tip out to make it easier for guests to serve themselves. And when adding a round cheese, slice a few pieces, and let guests do the rest! Step 3: The Meat Add the cured meats. Again, place with texture in mind. Prosciutto can be set like ribbons, and salami can be folded in halves or quarters and then arranged like a deck of cards. Spread out over the board. Step 4: Filling it in Add items that require small ramekins like the preserves, olive tapenade and honey. Use the same kind of ramekins, or ones in similar colors so that they don't distract from the overall presentation. Arrange in different areas of the board. Next, add the fresh fruit. Try strawberries, grapes, apple or pear slices and blueberries. But really it's whatever you like! If adding grapes, cut into clusters so guests can take a whole cluster and not have to fumble with the vine. Then, tuck in your breads and crackers, pairing them well with the cheese selections. For example, set a salty rosemary cracker next to a mild cheese like goat cheese. And lastly, bring in some extra textural elements with dried fruits, nuts, pickles and figs, when in season and fill in the empty areas of the board VOILA! You are done and your guests are ready to enjoy! 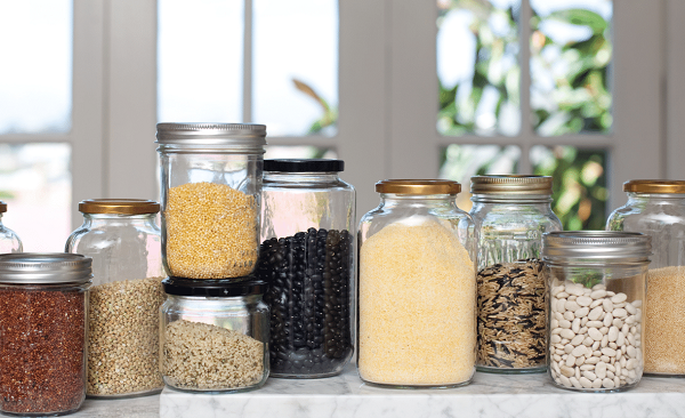 Raise your hand if you're constantly running to the store to pick up ingredients you need for a recipe. Keep your hand up if you have a pantry full of (expired) ingredients you've used once. I'm looking at you, cardamom and mustard seeds. Now imagine a perfectly stocked pantry. A 25-ingredient pantry where all of the essentials are ready and waiting. A pantry where you have plenty of what you need and it's all organized and pretty in shiny canisters and jars. You're smiling, aren't you? Me too. We are all about making your life more awesome. And we think that it's awesome to save time and money by having most of the ingredients you need on hand. These are ingredients you're comfortable with, ingredients you love to use, and ingredients you can easily buy in bulk (yay for saving money and reducing packaging). With these ingredients you can make super tasty recipes like the Yummiest Hummus, Very Versatile Baked Rice, The Best Red Sauce, Chewy Bagels, Quick Fluffy Flatbreads, Veggie Chili, and more...just using your pantry plus two or three extra ingredients from your FPP delivery. Now that's awesome. If you're ready to clean out those cabinets and stock your perfect pantry, hurray! Your shopping list is below. Please make any substitutions as your dietary needs/preference dictate and definitely consult with your health care professional if necessary.
|

 RSS Feed
GET IN TOUCH |
PROUD SUPPORTER
|
OUR PROGRAMS |
|
2023 FRONT PORCH PICKINGS | TERMS OF SERVICES